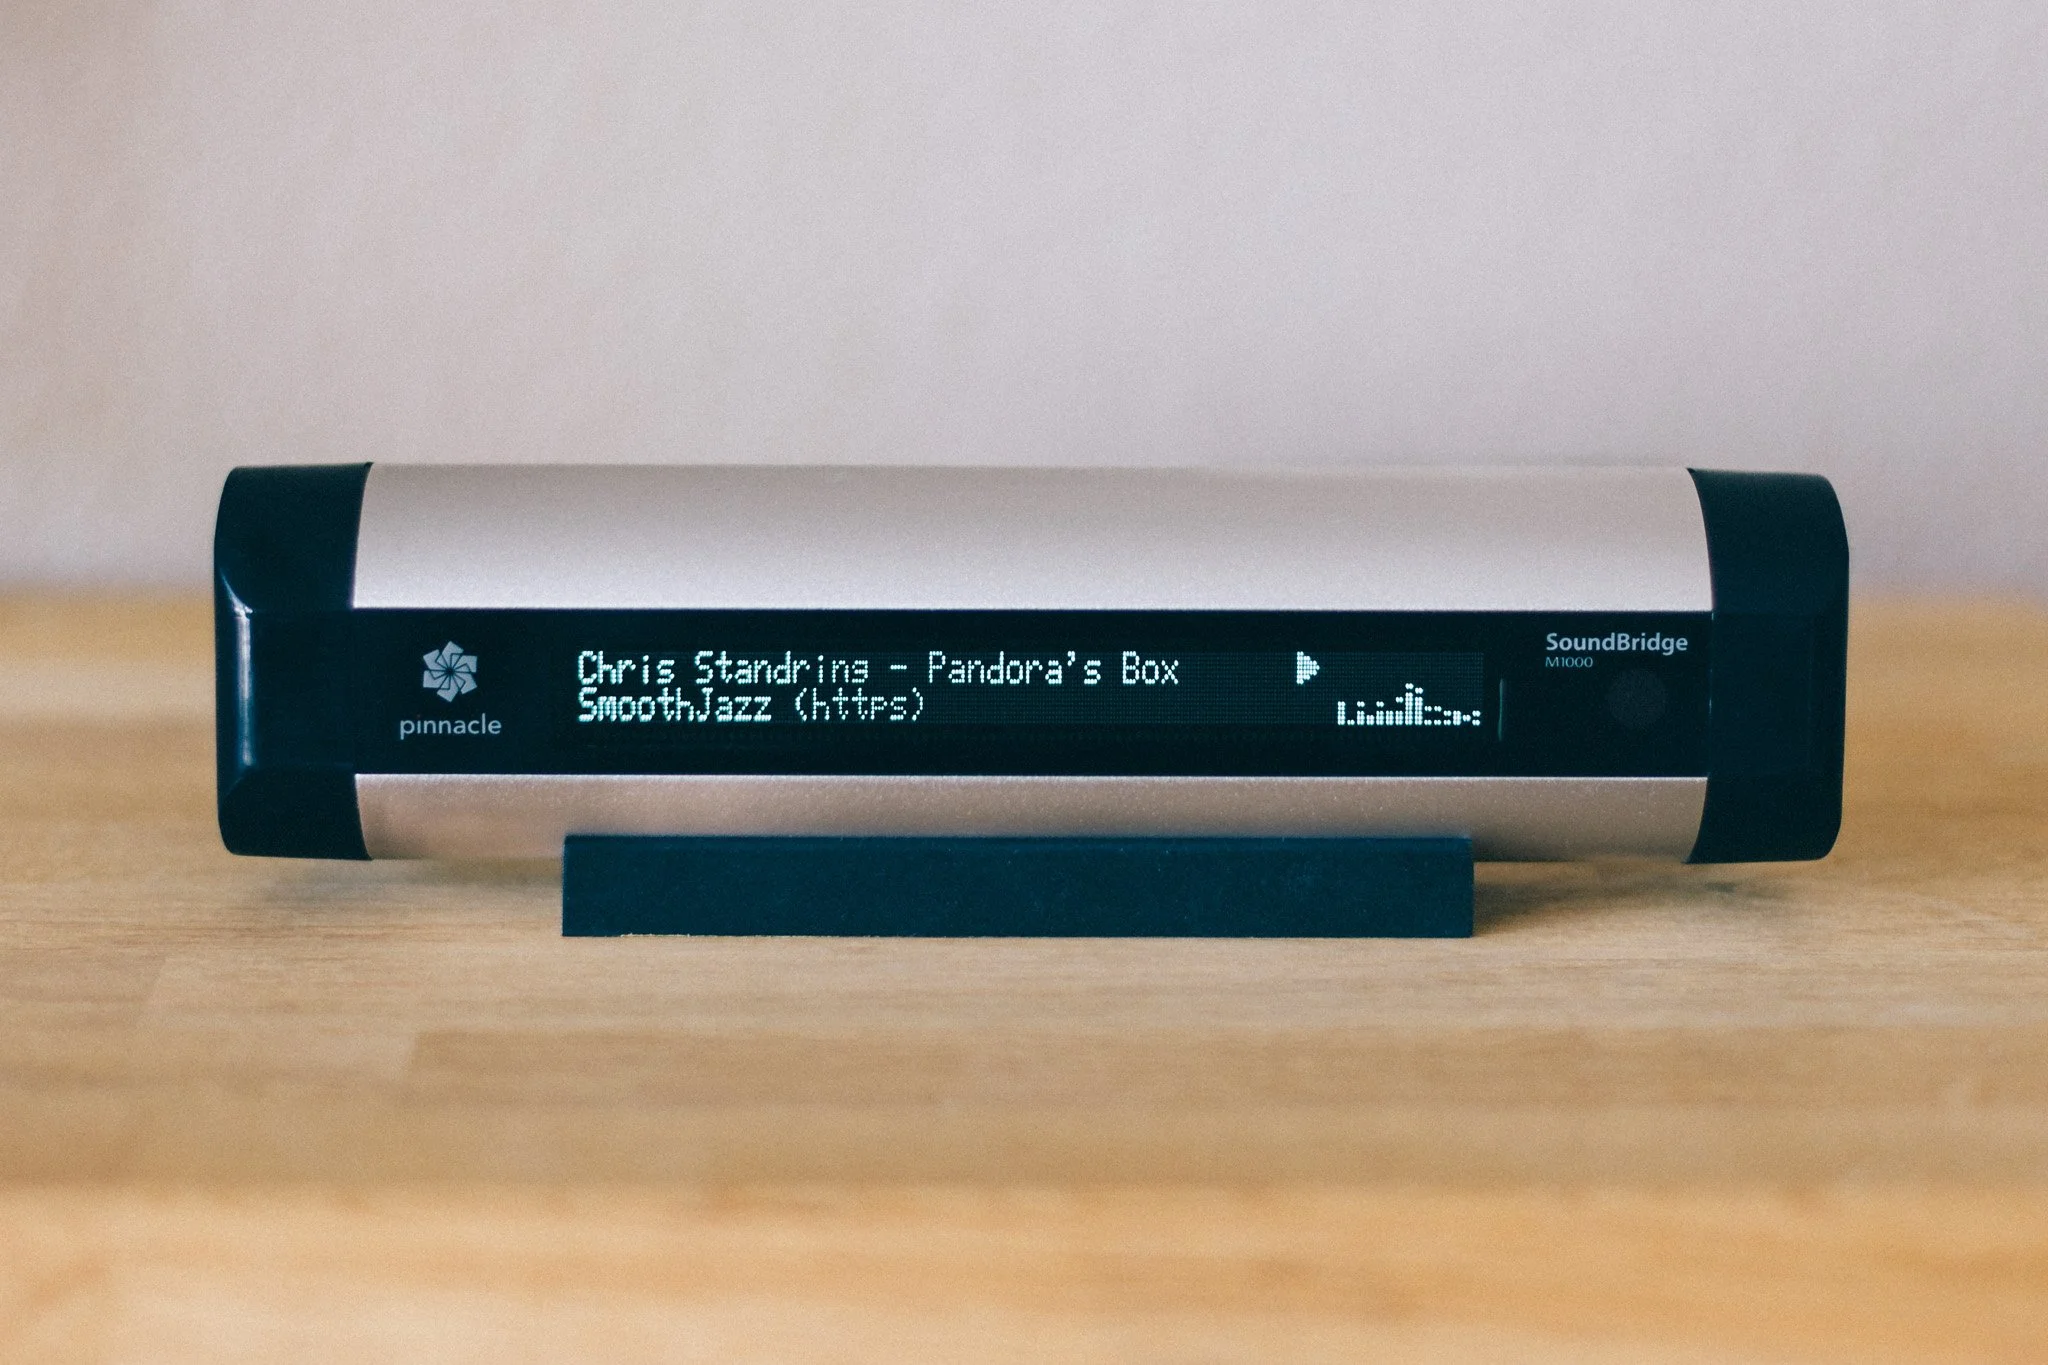
Roku SoundBridge – Saving a timeless network music player by Andrew B. Powers

Roku SoundBridge M1000 M1001

Still in use.

There are some devices that, even many years after their introduction, still make you wonder why nothing comparable is available anymore. For me, the Roku SoundBridge is definitely one of them!

I use the SoundBridge as a network music player connected to my stereo system. The device comes from a time when networked music was still something rather special, and streaming services as we know them today were still far from being part of everyday life. And yet, the basic concept behind the SoundBridge still feels surprisingly modern.

What I particularly like, especially compared with many modern streaming devices, is this clear separation of functions. The SoundBridge does not try to be a television, voice assistant, smart home hub, and cloud terminal all at once. It is a network music player. And that is precisely what makes it so interesting even today.

Ahead of its time.

With the SoundBridge, Roku had created a device that was remarkably well designed, both technically and conceptually, for its time. The first generation consisted of three models: the M500, M1000, and M2000. The three models were closely related technically and differed primarily in the type and size of their displays, as well as in their respective enclosure sizes.

The M500 did not have a graphics-capable VFD display and was therefore the simpler version. The M1000, by contrast, featured a large, graphics-capable VFD display that was remarkably impressive for a network music player of its era. The M2000 was larger still and correspondingly more expensive, but offered a display that remained easy to read even from a greater distance.

And that excellent display is, for me, still an essential part of the SoundBridge's character. While many modern streaming devices display information primarily through a smartphone app, the SoundBridge itself can show the currently playing track, the artist, or the selected source. It feels like a genuine standalone Hi-Fi component rather than a small network adapter whose actual user interface happens to live on a smartphone.

The first generation has, of course, long since become a piece of technology history. Even back then, the models were gradually replaced by the second generation. Today, M500, M1000, and M2000 units can generally only be found used, with the occasional old remaining stock turning up here and there.

The second generation included the M1001 as the successor to the M1000. Interestingly, Roku initially marketed the M1001 in some cases under the M1000 name as well, even though there are genuine differences between the two devices. They look very similar from the outside, but the M1001 has a somewhat different set of connections, with the connectors conveniently located on the rear panel.

The SoundBridge was also manufactured under license by Pinnacle for a time, particularly for markets outside North America. The Roku and Pinnacle units were essentially identical, although there was one important difference when it came to support for Apple's DAAP protocol: Pinnacle did not have a DAAP license from Apple. As a result, a Pinnacle SoundBridge could not directly access Apple iTunes shares or other DAAP servers. For iTunes users, however, Firefly provided a very good alternative server solution that was useful for more than just this particular purpose.

First & second generation - technically different.

The differences between the first and second generations were not limited to the enclosure, connectors, and features. The second-generation SoundBridge models, including the M1001, were based on a different audio architecture than the first-generation M500, M1000, and M2000.

The first generation in particular was appreciated by more demanding listeners for its audio quality. It also offered features such as HDCD support and DTS passthrough that were no longer available in the same form on the later models. Some owners therefore considered the audio quality of the second generation to be less impressive. At the same time, the new audio architecture was one of the reasons Roku was able to offer the devices at a significantly lower price. For most users, however, the sound quality remained more than adequate.

The second generation brought other advantages in return. It had a larger flash ROM, and Wi-Fi was built in. Firmware 2.7 also added WPA support, while the first generation was limited to WEP for wireless networking. The second generation was therefore not simply a technically inferior version of the original devices, but rather a further development with a different focus: lower cost, more modern networking capabilities, and a broader target audience.

Hardware - focused on the essentials.

Another thing I like about the SoundBridge is its remarkably straightforward and purposeful design. The device was not overloaded with as many features as possible, but instead focused on its actual purpose: receiving music over the network, processing it, and delivering it in good quality to a stereo system.

For music playback itself, the SoundBridge does not need a hard drive, an optical drive, or a fan. There are no mechanical components that have to be constantly moving during normal playback.

The SoundBridge connects to a music server or other source over a TCP/IP network. It processes the data and then outputs the music through its various audio connections. Depending on the model, this could be done via Ethernet or Wi-Fi. On the classic M-series models, the connection to the stereo system could then be made either via analog RCA or digitally through an optical or coaxial output, making the SoundBridge particularly interesting for a high-quality Hi-Fi setup. The analog output was also quite good. Personally, I have always found the overall sound quality excellent, and in comparison with older CD players connected via analog outputs, the SoundBridge actually sounded better to my ears.

Of course, this straightforward design does not mean that a device more than twenty years old is automatically free from age-related issues. Electronic components age, power supplies can eventually develop problems, and even a VFD display will not remain as bright and contrast-rich as it was on the first day. The underlying concept, however, is remarkably durable. The SoundBridge was not built around a short-lived online platform, but as a standalone network music player.

That technical simplicity is also part of its appeal for me. Essentially, it needs power, a network connection, and a connection to the audio system. For a device whose sole purpose is to play music, that is actually a remarkably well-defined job description.

soundbridge m1001 audio cabinet beastie boy books vintage receiver mid century house powerssowi soundbridge wizard

SoundBridge & Internet Radio

With later firmware versions, the SoundBridge also became particularly interesting as an Internet radio player. Starting with firmware 3.0, Roku integrated an online database containing a large number of radio stations, allowing users to search for stations and select them directly on the device. At the time, this was an exceptionally convenient solution.

There was no need to search for a stream on a computer, copy its address, and then somehow transfer it to the stereo system. The SoundBridge could search for radio stations itself and play the selected station directly.

The station database, however, was also a service external to the hardware itself. If the RadioRoku server was unavailable, new radio stations could not be selected through the database. Stations that had already been saved remained available, however. The SoundBridge provides 18 presets, allowing radio stations to be stored directly on the device and recalled even when the online database was unavailable.

At the time, this was an extremely practical solution. It also illustrates a problem that only became apparent years later with many devices from this generation: hardware can remain functional for far longer than the services it was originally designed to depend on.

Limitations in today's world.

Of course, by today's standards the SoundBridge is no longer a modern streaming device. It does not support the wide range of current streaming services that people expect from today's products, and its firmware has not received any major development for many years.

Modern HTTPS streams - big problem!

When the SoundBridge was developed, the technical requirements for Internet streaming were considerably simpler. HTTP-based audio streams were widespread, and communication between client and server was correspondingly straightforward.

Today, the situation is different. HTTPS has long since become the standard, and modern streaming servers use TLS encryption, current certificates, and protocols that network software from that era does not necessarily support.

For a modern computer, this is usually not a problem. Browsers and operating systems take care of certificates, encryption, and the latest protocol versions. Smartphones and modern streaming devices are also regularly updated and can therefore adapt to changes on the server side.

A SoundBridge naturally does not have the same ability to adapt. Its firmware comes from a different technological era and has not been updated for a long time to reflect the continued evolution of the Internet. The SoundBridge supports a surprisingly broad range of networking technologies for a device of its age, including WEP, WPA, AutoIP, DHCP, TCP, Telnet, HTTP and DRM. What it does not support, however, is HTTPS.

That missing HTTPS support is particularly significant today. The SoundBridge can communicate perfectly well over a TCP/IP network and can establish HTTP connections to streaming servers, but it cannot itself establish the modern TLS-encrypted HTTPS connections that have become standard on the Internet.

The last firmware updates were essentially limited to smaller fixes and adjustments, for example when changes were made to other services or protocols. There was therefore no later firmware development that could bring the SoundBridge's networking capabilities in line with the modern HTTPS-based Internet.

As a result, a stream can work perfectly well on a modern computer and still fail to play directly on the SoundBridge. The SoundBridge itself is not necessarily the problem. It can still reproduce audio extremely well, and it can still establish network connections. The difficulty arises where the capabilities of an older client meet the requirements of a modern streaming server.

At some point, that left me with an obvious question: Could this problem be solved without modifying the SoundBridge itself?

The solution - a proxy server.

The answer was surprisingly simple: the SoundBridge does not have to establish the modern HTTPS connection itself.

If a small server on the local network handles the connection to the Internet radio station, that server can take care of the technical requirements of the modern streaming server. It can then provide the SoundBridge with a stream that it can process using its existing capabilities.

This does not modernize the SoundBridge itself. Instead, it simply adapts the connection between the old hardware and the modern Internet.

For this purpose, NGINX was a natural choice. NGINX is a powerful web server and reverse proxy that is well suited to establishing a connection to a remote server and forwarding the resulting data stream to another client.

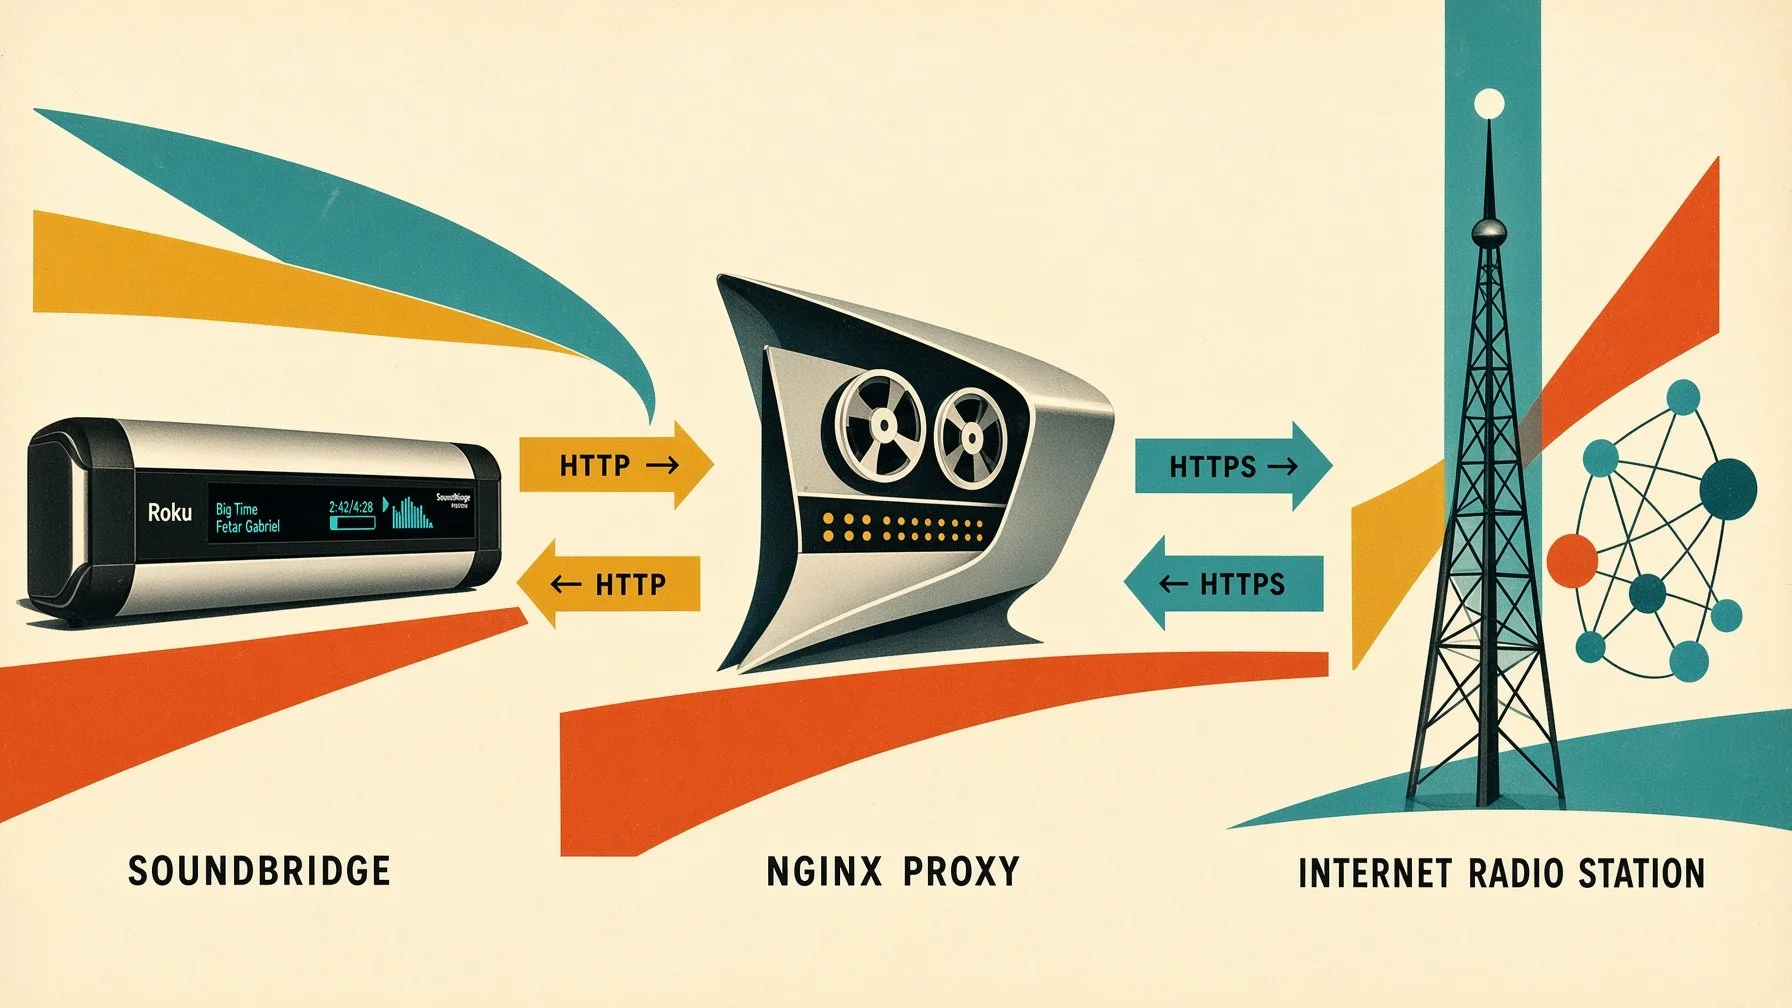
The basic setup is quite simple. The SoundBridge connects to a local HTTP address. NGINX accepts that connection and establishes an HTTPS connection to the actual radio station in the background. The incoming audio stream is then forwarded to the SoundBridge without unnecessary buffering.

In this way, the SoundBridge can continue to work with its existing network protocols, while NGINX handles the modern HTTPS connection to the radio station in the background.

First working solution.

Once the basic idea for the proxy had been established, the next step was to turn it into a working solution. I therefore decided not to install NGINX directly on the host system, but to run it inside a Docker container. NGINX does not require a complex environment and can be operated completely separately from the actual system installation. The required configuration, ports, and runtime environment of the proxy are therefore contained within a clearly isolated container. If the configuration needs to be changed later, or the proxy needs to be rebuilt completely, the underlying system remains largely unaffected.

Another advantage is easy reproducibility. The NGINX configuration can be managed independently of the underlying operating system. The container can be stopped, restarted, or recreated whenever necessary, without having to manually reinstall and configure NGINX on the host each time.

For managing the container, I used Portainer. Its graphical interface is extremely convenient, although Portainer is by no means required - Docker can of course be managed entirely from the command line. For a small home server, however, having a graphical interface makes administration considerably more convenient.

The actual NGINX configuration for this first solution consisted of two files. The first file defined the basic NGINX environment and specified, among other things, where logs were stored, which network parameters were used, and that additional server configurations should be loaded from:

/etc/nginx/conf.d/

The second file then defined the actual HTTP server. NGINX listened on port 80 and therefore provided a standard HTTP endpoint for the SoundBridge within the local network. The crucial part of the configuration was the address structure:

/soundbridge/URL

This allowed the SoundBridge, for example, to access a local address such as:

http://192.168.1.1:8777/soundbridge/...

NGINX received this request and used the part of the address following /soundbridge/ as the destination for its connection to the actual radio station.

The crucial difference compared with the SoundBridge itself was that NGINX could establish the connection to the destination server using HTTPS. The configuration therefore explicitly instructed NGINX to use HTTPS when connecting to the remote server. SNI was also enabled, and TLS 1.2 and TLS 1.3 were allowed for the connection to the remote server.

This created a clear separation between the two sides of the proxy. On one side, the old SoundBridge communicated with the local NGINX server using its existing network protocols. On the other side, NGINX established the modern HTTPS connection to the actual streaming server.
mid century space age palm springs shag soundbridge http https proxy server powerssowi soundbridge wizard

That separation was the key element of the entire solution. The SoundBridge therefore did not need to understand TLS or deal with the certificates used by the modern streaming server. From its perspective, the proxy was simply another network server on the local network. The modern encryption and all the associated requirements were handled entirely on the other side of the proxy.

Optimized for Streaming.

A normal web server does not necessarily have to be configured for maintaining a connection as a continuous data stream for hours at a time. For an Internet radio stream, however, that is exactly what is required. The server is not downloading a completed file. Instead, it continuously receives new audio data and immediately passes that data on to the client.

The NGINX configuration was therefore adjusted specifically for this purpose. Proxy buffering was disabled, as was caching. NGINX was not supposed to store the audio stream temporarily and then forward it in larger blocks. Instead, the incoming data should be passed to the SoundBridge as directly as possible.

The timeouts were also configured with longer intervals. A radio station does not terminate a connection simply because a complete file has not been transferred within a few seconds. The stream remains open and continuously delivers new audio data.

Various HTTP headers were also configured to improve compatibility with different streaming servers. These included a custom User-Agent and the forwarding of the Host header. NGINX was intended to identify itself clearly as an independent client to the radio station, while the SoundBridge continued to see a simple HTTP connection on the local side.

The configuration also included a simple health check. A separate local path could be used to verify whether the NGINX server itself was reachable. Although this was not necessary for audio playback, it made troubleshooting a running container considerably easier.

soundbridge m1001 vintage receiver mid century house powerssowi soundbridge wizar

Conclusion.

The result was a surprisingly simple solution to a problem that initially appeared to make the SoundBridge obsolete. Instead of replacing the player with a modern streaming device, I was able to keep the original hardware in use and adapt it to the technical requirements of today's Internet radio.

What makes the solution particularly appealing to me is that the SoundBridge itself remains completely untouched. Its original firmware, hardware, display, controls, and audio architecture can continue to be used exactly as they were designed.

In other words, rather than replacing a perfectly good piece of hardware simply because the Internet around it has changed, the solution adapts the connection between the old device and the modern Internet.

And that is ultimately what makes the SoundBridge worth saving.

Check out this new great solution for your SoundBridge too


If you have any questions, please drop me a message!

How to get the latest version of Python on your Mac - The right way! by Andrew B. Powers

pythonlogo.jpg

How to install the latest version of Python on Mac OS (Big Sur)? A walk through for you!

If you run into this error…

WARNING: pip is being invoked by an old script wrapper. This will fail in a future version of pip. Please see https://github.com/pypa/pip/issues/5599 for advice on fixing the underlying issue. To avoid this problem you can invoke Python with '-m pip' instead of running pip directly.

…you have a problem with your Python installation!

Why you get this error message?

Python on a Macintosh running Mac OS is in principle very similar to Python on any other Unix platform. By default Mac OS comes with a Python 2.7 pre-installed by Apple, because several parts of the Mac OS rely on Python 2.x scripts, that Apple haven't updated yet. So the “for legacy purposes” is as much for Apple as any third-party scripts. Unfortunately it's either somewhat or very out of date, especially if you need Python 3.x.

How to fix it and overriding the old default pre-installed version?

I used Homebrew to (re)install Python and it’s really easy. Here is how to do this…

Open the terminal and enter this line to update Homebrew:

> brew update

To (re)install Python, run this command:

> brew install python

To see which version of Python your Mac is recognizing, enter this:

> python --version

It is still recognized only Python 2.7.17, you have to run the following command:

> brew info python

It told you the path to the newly installed Python 3.x.x. and this is what the command returned to you in terminal:

pyhtonhomebrewversion.png

Now you have to change the path to Python in order for your Mac to recognize the just installed current version. So you have to add the following line at the bottom of the .zshrc file, to update the path to the new (re)installed version of Python 3.x.x via Homebrew:

> export PATH=/usr/local/opt/python/libexec/bin:$PATH

Then you make sure to quit the terminal window and go back in, so that the path would actually be updated in a new terminal window instance. Now check what version of Python was recognized, with:

> python --version

And this is what executed command returned:

Python 3.x.x

Yeah, success! That was quit simple, right!?
Happy coding!


Do you have any recommendations or personal guidelines that you find helpful?

Please feel free to comment and share your thoughts on “How to get the latest version of Python on your Mac - The right way!”.


If you like my work or the free stuff and want to say thank you, please use this opportunity now and

 
Buy Me a Coffee at ko-fi.com
 

THANK YOU, very much! 🙏🏻


POWERSTALLY - DIY Plug-and-Play Tally Light for OBS Studio by Andrew B. Powers

recodingsign099.jpg

The POWERSTALLY is a Tally Light/”ON AIR”/”RECORDING” sign for OBS Studio (fully Plug-and-Play).

During the COVID-19 (Corona) pandemic of 2020 and the associated lockdown, social life largely came to a halt and “social distancing” makes it impossible to hold meetings or events. Creative alternatives are being sought, many activities are moving online. So live video streaming or recording podcast/radio interviews remotely, is more popular than ever.

What is a tally light and why do you need it?

A tally light is a small signal-lamp on cameras or monitors and communicate, for the benefit of those in front of the camera as well as the camera operator, that the camera is live on air and the signal is being used for the main program at that moment.

Putting your old Raspberry Pi to use… or a new one!

The Raspberry Pi is a very cool tiny computer, that has many use cases. If you have an old Raspberry Pi laying around, don't let your old buddy sit forgotten and unused. The older Raspberry Pi models are also powerful enough for this awesome (DIY) project.

raspberrypirelayboard001.jpg

OBS Studio Setup

obswebsocketsserversettings.png
 
  • In your scenes, rename all the scenes that you want to illuminate the tally light so that it includes a “+”. That character is the tally light’s signal to turn on. If you want to use a different character or use multiple tally lights with unique characters, just be sure to edit the python code accordingly.

obsscenes.png
 

Raspberry Pi Setup

  • Burn the latest version of Raspbian Buster Lite to a (micro)SD card. I use the Raspberry Pi Imager for macOS to do this.

  • To enable the SSH access, open the terminal, go to the boot drive on the (micro)SD card and create a empty file called ssh. Don't edit it!

      > touch /Volumes/boot/ssh 
  • My Raspberry Pi 1b has no inbuilt wireless card. So I upgraded it with the Edimax EW-7811Un. This little wireless nano USB adapter work out of the box. The only thing you should need to do is create the file with the correct setup.
    Create another file called wpa_supplicant.conf and open it with a text editor.

      > sudo nano /Volumes/boot/wpa_supplicant.conf

    Save the following text (note that country=ca is for the USA, use country=de for Germany, etc.) and safe the file (CTRL-X):

      ctrl_interface=DIR=/var/run/wpa_supplicant GROUP=netdev   update_config=1   country=US   network={           ssid="2.4gb-network-name"           psk="2.4gb-network-password"           }    network={           ssid="5gb-network-name"           psk="5gb-network-password"           }
  • Insert the (micro)SD card into the Raspberry Pi and power it up.

  • Connect to it via SSH:

      > ssh [email protected]
  • And change your password… yes, it’s important! ;-)

  • Update the system:

      > sudo apt-get update   > sudo apt-get upgrade
  • Install Python 3, pip, pythonping and multiping:

      > sudo apt-get install python3 python3-pip   > sudo pip3 install pythonping multiping
  • Install the following Python 3 modules for the OBS websocket client:

      > sudo pip3 install websocket-client obs-websocket-py RPi.GPIO
  • Create an text file to store the last IP address from OBS Websocket:

      > sudo nano /home/pi/obsaddress.log 

    Now you can enter the OBS Studio PC’s IP address into the text file. It will speed up the search for the first time, but isn’t necessary.

  • Change obsaddress.log ownership and permissions with:

      > sudo chown pi /home/pi/obsaddress.log   > chmod 777 /home/pi/obsaddress.log
  • Create the Python script:

      > sudo nano /home/pi/powerstally.py
  • Copy the code from my repository (https://github.com/andrewbpowers/POWERSTALLY).
    Edit the trigger_char variable if you don’t want to use the “+” character as a trigger.
    Make sure the password matches what was set in OBS Studio Plugin obs-websocket. And safe the file (CTRL-X).

  • Set the code to execute on boot:

      > sudo raspi-config

    Got to “Boot Options” -> “Desktop/CLI” -> “Console Autologin” -> “OK” and finish. But don’t reboot yet!

raspberrypiraspiconfigbootoptions001.png
  • Edit the boot script:

      > sudo nano /etc/profile

    and add this new line at the very end of the file and safe it  (CTRL-X):

      sudo python3 /home/pi/powerstally.py
raspberrypibootscript001.png
  • The cheap Edimax WiFi dongle worked pretty fine with the Raspberry Pi. But one problem I found is, that the WiFi connection would drop after a certain amount of inactivity. Time to disabling the WiFi power management permanently.

      > sudo nano /etc/modprobe.d/8192cu.conf
  • Enter this text and safe the file (CTRL-X).

      > options 8192cu rtw_power_mgnt=0 rtw_enusbss=0

    But this works only with WiFi chipsets from Realtek (in this case a RTL8192CU).
    How to check that wireless adapter was recognized and what driver is currently using?
    Easy! Type in following command:

      > lsmod
  • Reboot the Raspberry Pi

      > sudo reboot

Hardware Setup

  • The status light
    Building the circuit for the status LED, is very simple and easy. I use a 2v/20mA yellow LED and a 150 ohms resistor. Note the polarity of the LED. The long lead should be connected with the resistor to pin GPIO4 (pin 7) and the short lead should be connected to ground (GND) on the Raspberry Pi as shown on the diagram below. The status LED is optional, right, but I would recommend it - a very good way to know that the system is booted, connected and active.

  • The Tally Light/“ON AIR”/”RECORDING” sign

    To control high voltage/high current with the Raspberry P, I suggest you to pick up a relay module for this purpos, like the Waveshare RPi Relay Board. It will make your job much easier. Relay boards can be high or low active. So please check the specifications of the relay board and modify the powerstally.py python script it if necessary.

    CAUTION: Working with 110v/230v AC mains can be very dangerous! Please be extremely careful and take help from an expert.

raspberrypirelayboardcircuit001.jpg

My DIY “RECORDING” sign

I have been looking for a vintage “ON AIR”/”RECORDING” sign for a very long time. Unfortunately I didn't find one that I liked. Someday I decided to build my own pretty cool old school sign. The POWERTALLY was the perfect opportunity to get started and merge these two projects.

I cut some strips of Multiplex and built a simple wooden box (400mm/15.75” wide, 150mm/5.91” deep and 140mm/5.11” high). I stain it later and make a nice steel frame with a brushed look for the front too.

recodingsign001.jpg

I add two notches for the power cable. One into the backside and one into the housing bottom. Two small hooks mounted additionally on the back. So wall mount and stand, both possible and allows more flexibility.

recodingsign004.jpg

I mount the Raspberry Pi, the power supply unit and the relay board on the backside of the case. Give an easy access to all components, as well as to the (micro)SD card, USB-ports and ethernet port of the Raspberry Pi.

recodingsign002.jpg

I use white spray paint on the backside of the Plexiglass. For the front I use a desktop cutting machines to make self-adhesive letters and stick it on. Next I hit it with red spray paint. After the dry time I carefully peeling the letters and making sure not to peel off the paint as well. I install the yellow signal LED on the left side of the case and right next to it, a vintage style toggle switch. This makes it possible to light up the “RECORDING” sign as an normal lamp too. Pretty convenient!

recodingsign003.jpg

All in all, I have fun with this project and I’m really happy with the result. The “RECORDING” sign is so nice, that can go pretty much any room.

If you are looking for a unique and retro “ON AIR”/”RECORDING” sign to put in an studio, loft, entertainment center or man-cave, etc., I highly recommend making a cool DIY letter sign too.

recodingsign088.jpg
recodingsign078bw.jpg

Okay, so here are the parts and tools that I used for this project:

Parts:

Tools:


Happy building! :-)

Please do not hesitate to contact me or leave a comment for further questions.


If you like my work or the free stuff and want to say thank you, please use this opportunity now and

 
Buy Me a Coffee at ko-fi.com
 

THANK YOU, very much! 🙏🏻


POWERSRACK - Design Studio Rack by Andrew B. Powers

powersrack001.jpg

The POWERSRACK is beautiful uniquely handmade 19 inch studio rack design edition.

It’s made from very solid 18mm/0.71” (base/top) and 15mm/0.58"" (sides) multiplex beech panels. The embedded and stable aluminium slinding rails, makes it easy for installation of rack units. The rubber bands inside, prevents the screws from ratteling and holds them in place. The front of the rack and the rails are angled at 7 degrees, for more convenient display of your studio equipment. With the hairpin (4”/10cm) legs, the POWERSRACK will add both. Stability and a mid-century modern, timeless style. The racks holds up to 11U of gear, with room for extra cable storage. Every single detail, from function to finish, is tailored for your next great music production.

powersrack002.jpg

The wood of this model was staining with a mid walnut (“WEST HOLLYWOOD”) color and finished by five coats of finest shellac. So the surfaces looks different, as the angle of view or the illumination changes. Awesome!

powersrack003.jpg

The racks are 530mm/20.87” wide, 400mm/15.75” deep and 640mm/25.20” high. Available in colors of walnut (“WEST HOLLYWOOD”), grey (“BROOKLYN”), blue (“SHOREDITCH”), red (“KREMLIN”), green (“ASHTOWN”) and cherry wood (“SHINJUKU”). This studio rack is available in UK, USA, Canada, Europe and Australia.

Designed and manufactured with ❤️ in the California and England.


If you have any questions, please drop me a message!
Stage pit etiquette and tips for concert photographers by Andrew B. Powers

The stage pit, as any music photographer knows, can often be a very busy, narrow and crowded space. Whether you're squeezed into a tight stage pit in a club or amidst a sea of fellow photographers in a sprawling festival pit, the competition for limited shooting space and optimal angles can be fierce.

In such a setting, a dash of courtesy can work wonders and possessing a firm grasp of the proper etiquette can significantly enhance the experience of capturing concert moments as a music photographer.

This guidance is relevant to music photographers of all levels, serving as a valuable refresher for veteran professionals and an essential guide for those new to the world of music photography. By embracing these etiquette principles, you can move and perform in the stage pit with the professionalism of an experienced pro.

101 stage pit etiquette for music photographers

Respect

The number one rule!

Every action you take in the pit should emanate from a core foundation of respect. It's respect for your fellow photographers, respect for the artists gracing the stage, respect for the passionate fans, and above all, respect for every individual diligently contributing to the success of the event. In this realm, there are no allowances for exceptions!

All fellow photographers with a photo pass possesses the same rights to access the pit and capture their shots, without exception. We share a common goal – to capture extraordinary images. By entering the stage pit with respect at the forefront of your mindset, we can collectively enhance our chances of creating remarkable photographs without any unnecessary drama or conflict.

Outfit

This tip serves as both a courtesy to the artists and a consideration for the fans: Opt for black outfits!

As a photographer, you hold a unique and privileged position at the forefront of the stage. You're often very close to the artists and quite literally stand between the performers and their devoted fans. The choice to wear black it a deliberate step toward minimizing the presence and distractions. Embracing black attire is an integral facet of maintaining a professional appearance as a music photographer.

Pit access

My advice is to go early to the show rather than be late and fight your way through the crowds when the concert venue/festival area is fully packed. Sometimes the photographers are escorted via a side entrance or the backstage area in front of the stage, directly into the pit. There will be a meeting point somewhere, which will usually be announced to you by the people who are also responsible for your accreditation or you will find out from the staff at the entrance. Unfortunately, you don't get into this comfortable position very often as a usual music photographer. Often there is only one solution - to torture yourself through the crowd. This is not always a pleasure, but most of the time there is no other way to get to the front of the stage and into the pit.

When moving through crowds move slowly and plan you path. Avoid moving through areas where there’s much dancing, hopping, head banging going on. Let people know you are there by gently touching them on their shoulder. Be friendly and apologize if you step onto someone’s feet. Never push people aside but wait for gaps to slip through. Carry your camera gear above your head or visibly in front of you. Beware of burning cigarettes, beer cups, blood or vomit.

On the way to the stage or exit, many venues can be quite dark. A proven solution for this scenario is a Mini-Maglite. With this small flashlight you can literally “light the way”. Please avoid to dazzling anyone. The Maglite should be used primarily as a visual aid.

Gear

Exercise vigilance when it comes to your camera equipment and gear while in the bustling stage pit. Understand that it's an environment where equipment can endure some rough handling. Little accident can occur. If you inadvertently bump into someone and their gear, extend a quick apology and continue shooting.
To reduce the likelihood of such incidents, consider keeping your camera straps short, and if you're working with two camera bodies, ensure your second body and lens are snugly secured closer to your torso. Similarly, when navigating through the stage pit, carry your cameras close to your body to minimize the chances of accidental collisions.

3SNF

Flash photography is typically prohibited at most concerts. The standard rule in most venues is “First three songs, no flash!” (3SNF). So an off camera flash has absolutely no place in the pits.

Even if you have it mounted the flash but don't intend to use it, it's probable that you get hassled by security. Besides, having a flash in the stage pit adds an unnecessary obstruction for fellow photographers, hindering their ability to capture shots effectively.
For ensuring a smoother and unobstructed shooting experience for all, please stow away your off-camera flash, while your are in the stage pit.

Backpack

Here's a significant consideration. In a densely packed stage pit, avoid wearing a photo backpack at all costs. Trust me - everyone in that pit will thank you for it! But if you do, I can guarantee that everyone else in the pit will hate you. Stage pits are often already cramped, and having a backpack on significantly hinders movement for everyone, including yourself. It's advisable to stow your backpack at the sides or under the scaffolding of the stage. As a general rule, avoid putting your backpack in any place where it may of being in someone's way.

If you require quick access to lenses while shooting, opt for a belt with lens pouches or, at the very least, a messenger-style bag that can be worn on your side or front. This way, you can minimize your footprint in the stage pit while ensuring you have the gear you need at your fingertips.

Oneself noticeable

A small gesture of courtesy can have a significant impact. When you need to move past another photographer in the pit, a simple tap on the shoulder is all it takes. This allows them a moment to acknowledge your presence and make way for you, rather than you simply pushing through. This thoughtful approach can transform the stage pit into a more civil and cooperative space, and your fellow photographers will undoubtedly appreciate your consideration for both your own space and theirs.

Work, not dance

This guideline is quite straightforward. When you're donning a photo pass, there's an inherent understanding that your primary focus is your work while in the stage pit. However, should the music inspire you to dance or you simply wish to immerse yourself in a song by your favorite artist, it's courteous to relocate and find a spot along the side. This way, you can enjoy the moment without disrupting your fellow photographers.

Like a Ninja

When you moving through a crowded stage pit, exercise a high degree of awareness. While it's essential to capture the stage action, it's equally vital to respect your fellow photographers. Whenever possible, opt to move behind them rather than in front, ensuring you don't obstruct their shots. If you must cross in front of someone, make a conscious effort to crouch down, minimizing any interference with their shots. This considerate approach helps maintain a harmonious and professional atmosphere within the stage pit.

Overhead shots

Stages can be quite elevated, especially at festivals. Right! So if you find yourself in the situation where you must shoot with your camera raised high over your head and do a "Hail Mary", I really kindly consider you doing it from the rear of the stage pit. If not, it will just create another challenge for everyone behind you.

Film crews

Like it or not, cameras from film crews take up a lot of space in the pit and on the stage. Apart from that, they are most likely right on the spot where you want to stand. They are often in your picture and all the cables can drive you crazy.

Film crews can either come from a TV station or film at the request of the band. For example, for a live DVD/Blue-ray, a video clip, a streaming service or to show what happens on stage live big screens.

As filmed footage always has a more direct and bigger impact for the artists and record companies than photos, the TV and film crews are more important than you. So don't get in their way, and stay out of their shot. Look out for all the cables on the floor and the tracks for camera dolly systems. You definitely wouldn't be the first to fall over them.

Audience

Always remember that people in the audience have paid a lot of money for their tickets. A photographer standing right in front of them or walking by all the time is not what they want. Be considerate to the crowd standing behind you and try to disturb them as little as possible. Have a little chat with them before the concert starts, and tell them you will be out of their way after the first three songs. If the hall is seated, you should crouch down and try to walk around as little as possible. The fans are also often interested in when and where the pictures can be seen. This saves you a lot of moaning, shouting or worse.

Security

One of the most pivotal facets of stage pit etiquette is demonstrating unwavering respect for security and venue/event staff. While security personnel are primarily focused on the artist's and fans' safety, they also have your best interests in mind. It's genuinely advantageous for everyone involved to exhibit the utmost respect towards security and all event personnel.

When entering a new venue, taking a moment to introduce yourself to the security team can go a long way. For those who frequent a particular venue, fostering a rapport with security is even more beneficial. They can be your allies. Establishing a positive relationship with security is an asset you'll appreciate time and time again.

While it may seem obvious, it's worth reiterating that security directives are to be strictly followed. They have the authority to remove you from the stage pit if safety concerns arise or if there's a sudden change in artist policy that hasn't been communicated previously.

In the rare instance where security might make an mistake, such as miscounting songs, it's advisable to address the issue with the head of security in a polite and respectful manner. Anything less than that could result in you're going to get bounced.

STAGE pit!!!

The stage pit. Often also called “photo pit” - which is completely wrong!

First of all, it is important to note that the stage pit has a safety function first and foremost. It should separate the band from the audience and leave the necessary space for the securities to pull people out of the crowd.

The fact that you are allowed to enter the stage pit as a music photographer is a concession of the organizer and the securities, who are first and foremost responsible for the safety of the concert visitors and also for yours. Anyone who seriously believes that the stage pit is there especially for the photographers and that they have a legitimate right to use the pit, is badly wrong.

Conclusion

If I were to encapsulate the essence of "stage pit etiquette" in one word, it's unequivocally "RESPECT"!

As I wrap up, I'd like to leave you with this parting reflection - while much of this guidance may appear to be common sense, we can all benefit from a gentle reminder.

If you observe someone's actions negatively affecting everyone in the pit, consider engaging in a constructive conversation about how their behavior impacts everyone, instead of just grumble about it. We all have the opportunity to do better. After all, we're all in this together.

Do you have any recommendations or personal guidelines that you find helpful?

Please feel free to comment and share your thoughts on “Stage pit etiquette and tips for concert photographers”.


If you like my work or the free stuff and want to say thank you, please use this opportunity now and

 
Buy Me a Coffee at ko-fi.com
 

THANK YOU, very much! 🙏🏻


How to stop Photos from opening automatically on your Mac by Andrew B. Powers

Photos or iPhoto is a photo software app for your Apple Macintosh (Mac OS X) and it has one annoying option.

Every time when you connect your iPhone/iPad to your Mac or insert a SD-Card, the Photo app opens automatically. Then you probably hate it just as much as I do, it’s time to learn how to stop this problem.

Copy and paste the following command in Terminal and press Enter to prevent Photos from opening automatically:

defaults -currentHost write com.apple.ImageCapture disableHotPlug -bool YES

Congrats! Apple Photos should stay closed from now. Pretty easy or isn’t it!?

If you would like to re-enable the auto launching function in the future, no problem. Simply open up Terminal again and enter the following single command:

defaults -currentHost write com.apple.ImageCapture disableHotPlug -bool NO
 

Do you have any recommendations or personal guidelines that you find helpful?

Please feel free to comment and share your thoughts on “How to stop Photos from opening automatically on your Mac”.


If you like my work or the free stuff and want to say thank you, please use this opportunity now and

 
Buy Me a Coffee at ko-fi.com
 

THANK YOU, very much! 🙏🏻


Donots at Rosenhof, JAK 2014 by Andrew B. Powers

The Donots' JAK (Jahresabschlußkonzert = End-Of-Year Concert) at the Rosenhof in Osnabrück has become a very long and beautiful tradition. An amazing atmosphere and absolute exhaustion of the protagonists on stage, as well as of the fans, was once again the trademark of this special gig.

Although the band from Ibbenbüren not only celebrated their 20th anniversary this year, but also completed one of the most successful tours and recorded the new album (Karacho), the guys around Ingo Donot really put the pedal to the metal. The Donots performed a great concert and a very special evening filled with many memorable moments.

With "Karacho" (Vertigo Berlin (Universal Music)), the Donots will release an album in their native language for the first time in their career on 20. February 2015 and then go on tour a few days later. The tour starts on 03.03.2015 in Magdeburg (Alte Feuerwache) and ends on 27.03.2015 at the Reeperbahn (Große Freiheit 36) in Hamburg.

Special guests on this evening were Adam Angst, the new band around Felix Schönfuss. Many people will know the frontman from Frau Potz and Escapado. The self-titled album by Adam Angst (Grand Hotel van Cleef) will also be released on 20 February.

If you want to be at JAK 2015, you should get your tickets as soon as possible. Because they are always gone faster than you can imagine.

Yongnuo YN-622C-TX by Andrew B. Powers

Review - Der Yongnuo YN-622C-TX im Detail

Viele Fotografen arbeiten bereits schon etwas länger mit den Yongnuo YN-622C/YN-622N und haben deren Vorteile schnell schätzen gelernt. Bei diesen allerdings erfolgte das ändern und kontrollieren von den Einstellungen der Systemblitze lästig über das Kameramenü. Daher wurden schnell der Wunsch nach einer Erweiterung bzw. Verbesserung laut, um das entfesselte Blitze noch einfacher zu gestalten.

Mit mit dem YN-622C-TX hat der chinesische Hersteller eine neue Generation der (E/i)-TTL-Funkauslöser entwickelt, die als Master-Einheit zur Steuerung der YN-622 Transceiver dient und das zu einem sensationell günstigen Preis. Neben der Übertragung der E-TTL-/i-TTL-Signale, bietet das handliche Gerät ein benutzerfreundliches LC-Display, sowie manuelle Blitzsteuerung, Zoom, Flash Value Lock (FVL), Synchronisation auf dem 2. Verschlussvorhang, HSS Unterstützung bis 1/8000s und natürlich auch Supersync. Zusätzlich lassen sich per USB-Port zukünftige Firmware-Updates aufspielen.

Wie von dem YN-622C/YN-622N  gewohnt, bietet auch der TX einen Mixed Mode zur individuellen Steuerung mehrerer Blitzgeräte im TTL, als auch im manuellen Modus. Hierfür stehen drei Gruppen und sieben Kanäle zur Verfügung, um z.B. die Leistung oder Reflektorstellung der Aufsteckblitze komplett unabhängig einzustellen.

Dank Supersync Timing Adjustment können endlich auch Studioblitze manuell nachjustieren werden, sodass die Auslösung des Blitzes und des Kameraverschlusses perfekt zeitlich synchronisiert ist. Die Einstellungen hierfür werden dabei automatisch gespeichert. Ein Feature was beim mir schon lange und ganz oben auf der Wunschliste stand.

Die Steuereinheit verfügt, wie die älteren Brüder ohne Display, über ein Laser-AF-Fokuslicht. Dies kann selbstverständlich auch ganz unabhängig von Aufsteckblitzen verwend. Durch die moderne Transceiver-Bauweise fungiert der TX aber nicht nur als Sende-, sondern auch als Empfangseinheiten. In welcher Funktion der Transceiver verwendet wird, erkennt der Trigger automatisch. Dank beigelegter Kabel kann der Funkauslöser daher nicht nur Blitze, sondern auch eine Kamera auslösen.

Außerdem verfügt das LCD auch über eine Batteriestandsanzeige.

Die aktuelle Firmware, Treiber und Software, sowie eine Betriebsanleitung in Englisch ist hier erhältlich. Leider ist die UpDate-Software momentan nur für Microsoft Windows-Systeme verfügbar und ließ sich nicht zur Zusammenarbeit mit einem Windows-Emulator auf dem Mac überreden.

Der Yongnuo YN-622C-TX E-TTL Transceiver funktioniert einfach klasse und die Bedienung ist fast selbsterklärend. Deshalb erleichtert er das arbeiten für ambitionierte Strobist-Anhänger ungemein. Für den Preis von rund 60€ ist der kleine schwarze Kasten ein absolutes Must-Have. Ganz besonders wenn man schon ein Paar Yongnuo YN-622C/YN-622N besitzt.

Im Lieferumfang enthalten sind neben dem Transceiver zwei Kamera-Verbindungskabel (C1/C3) und ein USB-Kabel, sowie eine Bedienungsanleitung in Englisch.

Natürlich steht die TX Steuereinheit auch für das Nikon-System zur Verfügung und trägt dann die Bezeichnung "Yongnuo YN-622N-TX i-TTL".

Yongnuo YN-622C by Andrew B. Powers

Review - Der Yongnuo YN-622C im Detail

Yongnuo hat vor Kurzem mit dem YN-622 endlich ein Produkt veröffentlicht, auf den viele Fotografen schon lange gewartet haben. Bei den Geräten handelt es sich um sogenannte Transceiver, bieten also Sende- und Empfangsfähigkeiten. Ein praktischer Nebeneffekt ist, dass man sich keine Gedanken darüber machen muß, was, wo und wie irgendwo aufgesteckt werden muß. Das eigentlich Kaufargument ist aber, dass die Teilchen die volle Funktionstüchtigkeit der Blitzbelichtungsautomatik (E-TTL) über Funk ermöglich, inkl. HSS (High Speed Sync). Es ergeben sich daher keine Probleme bei zu hellem Umgebungslicht oder wenn keine Sichtverbindung zwischen den Geräten besteht, wie es z.B. bei IR-System auftreten kann. Außerdem verfügen die Biester über ein absolute Killerfunktion, welche sich "Supersync" nennt. Damit ist es möglich, z.B. einen Studioblitz auch mit einer kürzeren Verschlusszeit als der Blitzsynchronzeit zu betreiben.

Die Transceiver sind relativ groß (ca. 90mm x 55mm x 25mm) und machen insgesamt einen recht wertigen Eindruck. Die Oberseite ist in einer Art Klavierlackoptik gehalten, was diese damit relativ empfindlich gegen Fingerabdrücke, Kratzer und Stau macht. Der Blitzfuß ist aus Metall und läßt sich mit einem Rad auf dem Blitzschuh der Kamera fixieren. Obwohl die Bezeichnung Rädchen viel besser passt, denn etwas grösser hätten die Teile wirklich sein können. Bestückt werden die Yongnuo YN-622C Transceiver mit jeweils zwei Mignonzellen. Es werden also keine seltene oder teure Spezialbatterien benötigt. Ich verwende auch bei diesen Geräten zwei Eneloop AA-Akkus von Panasonic. Die Taster besitzen einen angenehmen Druckpunkt, auch wenn diese etwas weniger plan sein könnten. Die Status LEDs für die Kanal- und Gruppenauswahl, sowie für die Information das eine aktive E-TTL-Verbindung besteht, die Batterien kurz davor sind die Hufe zu strecken oder das Gerät eingeschaltet ist, sind auch bei starker Sonneneinstrahlung noch gut zu erkennen. Außerdem befindet sich auf der linken Gehäuseseite noch eine Synchronbuchse. Diese ist harten Anforderungen allerdings nicht gewachsen. Man so sollte daher entweder ein PC-Sync-Kabel verwenden welches über ein Schraubverschluss für einen sicheren Halt in der Buchse verfügt oder irgendwie dafür sorgen, dass auf gar keinen Fall irgendwelche Zugkräfte auf den Anschluß ausübt werden.

Dem aufmerksamen Leser wird aufgefallen sein, dass die Transceiver keinen USB-Port besitzen und sich fragen, was passiert wenn sich die Protokolle für die Blitzsteuerung ändern bzw. wenn neue Blitze oder Kameras auf den Markt kommen. Da somit leider keinen Möglichkeit existiert die Firmware auf einen aktuellen Stand zubringen, muß man auf lange Sicht die YN622 wohl in die Kategorie Weg­werf-Geräte einordnen.

Grundsätzlich sollte man im Kopf behalten, dass die YN-622C in erster Line dafür ausgelegt sind Informationen zu übertragen und es sich um keine Steuereinheiten handelt. Zwar kann man ein paar Informationen an den Transceiver ablesen, großartig einstellen kann man aber nicht wirklich etwas. Die Kamera mit dem Blitzmenü dienen als Steuereinheit. Es werden also in der Kamera sämtliche Grundeinstellungen, Gruppen und Ratios voreingestellt und die Yongnuos sorgt für die drahtlose Übertragung. Genauso, als hätte man z.B. einen Canon 580EX II Systemblitz als Master-Einheit auf der Kamera. Obwohl mit dem Yongnuo YN-622C sogar noch etwas mehr möglich ist. Denn ein weiteres tolles Feature ist das syncen auf dem 2. Vorhang, dass im "Drahtlos-Modus" normalerweise gar nicht aktiviert werden kann. Allerdings müssen sich dann alle Blitze in einer gemeinsamen Gruppe befinden. Wenn die Kamera also die Steuerung übernimmt, dann bedeutet das leider auch, dass man sich auch mal mit unterschiedlichen angeordneten Blitzmenüs bei anderen Kameras herumschlagen muß. Teilweise kann z.B. auch nicht der 2. Verschluss als Sync-Zeitpunkt ausgewählt werden kann. Sogar eine Aufweckfunktion für Canon Speedlite-Blitzgeräte ist integriert. Damit man die komplette Leistungsfähigkeit der Transceiver nutzen kann, ist man also sowohl von dem Funktionsumfang der jeweiligen Kamera, also auch von dem eingesetzten Systemblitze abhängig.

Die YN-622C können auf zwei verschiedene Arten betrieben werden. Entweder im Fernsteuerungs- oder im Mix-Modus. Der Fernsteuerungs-Modus gewichtet die Einstellungen im Kamera-Blitzsteuerungsmenü mit einer höhere Priorität, als die meisten Einstellungen an den Systemblitzen. Der Mix-Modus hingegen, gewährt den Einstellungen an den Speedlite-Blitzgeräte höhere Priorität. E-TTL und manuelle Einstellung können zur selben Zeit betrieben werden.

Ein weiterer Vorteil ist auch die E-TTL-Passthrough Fähigkeit. Wenn ein Transceiver der auf der Kamera montiert ist der als Sender agiert und auf diesem wiederum ein Systemblitz steck, können die E-TTL-Signale trotzdem noch zum Blitz durchgeschleift werden.

Tipp: Falls einmal der seltene Fall eintreten sollte das die Transceiver nicht funktionieren, dann kann ein Factory-Reset helfen. Einfach die Taster "CH SET" und "GP SET" zusammen gedrückt halten. Die Statusanzeige blinkt abwechselnd drei Mal rot/grün. Anschließend leuchtet sie durchgehend rot. Die Tasten loslassen und die Werkseinstellungen sind wiederhergestellt.

Ein sehr schönes Feature ist, dass die Yongnuos über ein Laser-AF-Fokuslicht verfügen. Dieses ist so stark, dass dessen Grid selbst bei Tageslicht über mehrere Meter sichtbar und jedem AF-Hilfslicht eines schweren Systemblitzen überlegen ist. Einfach genial in Verbindung mit normalen Studioblitzen oder mobilen Blitzgeneratoren und Probleme beim Fokussieren bei Lowlight-/Highlight Setups endgültig zu verbannen. Aber selbst wenn man ohne Blitzgeräte fotografiert, lohnt sich dieses kleinen Plastikkästchen auf der Kamera, um diese beim schnellen Fokussieren zu unterstützen.

Bei anderen Funkauslöser, wie z.B. den alten Yongnuo RF-602C, befindet sich auf der Unterseite das typische Metallgewinde für Stativschrauben. Beim aktuellen Yongnuo YN-622C existiert diese Befestigungsmöglichkeit leider nicht mehr. Wenn man die Transceiver also z.B. an einem Stativ mit einer Softbox verwenden möchte, muß man sich anderweitig behelfen.

Hierbei sollte man z.B. zum Walimex Universal Blitzschuh greifen, da dieses aus Metall ist und auch starken Kräften sicheren Halt garantiert. Außerdem kann die Breite der Blitzschuhaufnahme individuell angepasst werden.

Die Yongnuo YN-622C E-TTL Funk-Auslöser sind wirklich klasse. Auspacken, aufstecken... und voilà, sie funktionieren sofort!

Für den Preis bekommt man einen Funktionsumfang, der nur noch wenig Wünsche offen lässt. Der Preis für ein YN-622-Pärchen ist äusserst verlockend. Selbst nur ein ganz simpler Transceiver von Pocketwizard ist in diesen Preisregionen nicht erhältlich und andere Alternative sind auch mindestens doppelt so teuer. Erhöhte Ausfallsicherheit im Alltag erlangt man durch die Transceiver-Konstruktion. Falls man allerdings einen Kamera verwendet, die nicht über die drahtlose Blitzsteuerung über das Kameramenü verfügt oder einen Blitz der nicht so angesteuert werden kann, ist die Bedienung der YN-622C eine absolute Zumutung. Im Lieferumfang sind zwei Yongnuo YN-622C E-TTL Funk-Auslöser enthalten, sowie eine Bedienungsanleitung in Englisch.

Selbst wenn man momentan nur manuelle Funk-Auslöser benötigt, sollten man zu den YN-622 greifen. Außerdem, wer sich jetzt nicht mit der Thema Supersync beschäftigt, der hat in naher Zukunft den Zug wirklich verpasst.

SuperSync - Higher than max flash sync speed by Andrew B. Powers

Flashing beyond the sync speed

Modern digital single-lens reflex cameras (DSLRs) use a mechanical shutter to control the exposure time. This opens at the set exposure time to allow light to reach the image sensor and closes again light-tight after the exposure time has elapsed. The shutter of current cameras consists of two curtains that run one after the other. After the shutter is released, the first curtain starts, releases the sensor and the exposure time is started. To ensure that the selected exposure time is maintained, the second curtain starts moving shortly before the end of the exposure time to completely cover the sensor again. In the following video you can see very clearly how the curtain of the Nikon D3s shutter behaves at shutter speeds of 1/100 second and 1/1000 second:

As the mechanical shutters cannot be opened and closed as quickly as desired, the described principle quickly reaches its limits with very short exposure times. On the video you can clearly see that the curtains behave quite differently at an exposure time of 1/1000 of a second. At the beginning of the exposure, the first curtain opens and increasingly exposes the image sensor. Before the first curtain has completely released the sensor, the second curtain already begins to close. As the first curtain is not yet fully open, an open slit now moves across the image from top to bottom. As the exposure time becomes shorter, this slit naturally becomes narrower. This is why this type of shutter is also called a focal-plane shutter (FPS).

If an picture is to be illuminated with a flash, the flash must be fired at exactly the right moment due to the very short flash duration, i.e. when the first curtain is fully open, the sensor has been completely released and can be illuminated. Therefore, only exposure times at which the two curtains of the shutter do not work as a “ slot” can be used, as otherwise dark bars will be visible in the final photo. This shortest selectable exposure time is called flash sync speed, sync time or X-sync. Typical flash sync speeds for cameras with a focal plane shutter are between 1/160 second and 1/320 second. This time includes the time in which the curtains are fully open and the movement time of the curtains.

Below this specific (flash sync) time, everything works without any problems with system flashes on the camera or studio flash units. But what options are there if you want to expose faster than 1/160s, 1/250s or 1/320s, for example, because you want to shoot with a wide-open aperture for creative reasons and despite sufficient ambient light, but don't want to use a gray filter or don't have one to hand?

Solution HSS/FP

Most system flashes have a technique that solves the problem with a simple trick. Instead of a single flash, the flash is transformed into a kind of fast “flickering light” and flashes continuously while the gap between the two shutter curtains moves across the sensor. This mode is called HSS for Canon and FP for Nikon. The advantage is obvious: the picture is illuminated absolutely evenly. But that's where it ends. Because the flash has to light up very often within a very short time, the loss of performance is exorbitant. In addition, only expensive system flash units that are HSS/FP-capable offer this technology, the flash tubes are put under a lot of strain and, above all, considerably more information has to be exchanged between the camera and the system flash than a simple “ fire now!”.

Solution Supersync

Portable flash generators or studio flashes are not HSS/FP-capable. Nevertheless, it would of course be nice to be able to use them faster than the flash sync speed?

The Supersync technology offers the desired solution to precisely this problem. Originally, the whole thing was discovered by chance when a studio flash was fired via a photocell with the TTL clip-on flash. It turned out that it can happen that the studio flash fires exactly during the time of the actual focal plane shutter exposure. But this is the crux of the matter - it can happen, but it doesn't have to!

The theory behind Supersync is quite simple. However, you should know something about the required technology.

TTL radio triggers are one of the most important. These work slightly differently to normal radio triggers and normally first send out a “metering flash” to measure the flash exposure. With Supersync, however, this metering flash “accidentally” fires the studio flash, which fires after a certain period of time. The camera then also starts its exposure. Actually, after the TTL metering flash, the main flash would be fired first. In this process, however, the studio flash has already been triggered and fires at the exact moment when the first curtain of the shutter is fully open. The result is a correctly exposed sensor. It is therefore important to have very precise timing, which is influenced by various factors, such as the firing time and the characteristic firing characteristics of the studio flash, the speed at which the signals are transmitted and processed, the exposure time set on the camera, the size of the sensor and the speed of the shutter. This makes it clear that Supersync cannot always work and that you simply have to try it out. However, a flash that fires “slowly” (but far too fast for the human eye) is a good basis, as you can see from the following diagrams.

The graph represents the flash firing characteristic and the gray bar the time the camera needs for the exposure. The setting for the exposure time is fixed. As the curtain moves from bottom to top, the drop in exposure is also clearly visible.

A flash that fires at high speed always has an extreme drop in performance. The faster the flash tubes, the less suitable they are for the SuperSync principle, as the drop in exposure is far too great.

So the slower a flash fires, the better. Even with just a little less speed, the exposure fall-off is already enormously reduced.

A flash with a slow flash tube achieves exactly the desired effect. An almost uniform exposure. Elinchrom's Ranger Quadra models with standard head (S-Head) are just suitable for this. The burn-off time of the Action series is already far too fast. However, the whole thing apparently only works at full power, as this is apparently regulated by the lighting duration.

However, the Jinbei FL-II Porty flash set incl. standard flash head is perfectly suitable for Supersync. Apparently, the flash duration of the Jinbei Porty is so long that you can select almost arbitrarily short exposure times across all power levels. Neither a great loss of energy nor a really visible progression is noticeable. Simply perfect! Together with the Yongnuo YN-622C E-TTL II radio flash trigger, an absolute dream team.

Conclusion

Supersync is simply great and offers incredible potential in terms of lighting and image composition. In addition, low-speed flashes finally have a reason to exist again. If there are still very slight gradients with some time/power combinations, these can easily be corrected with a graduated filter in Lightroom.

Shopping List of the products I’ve mentioned

All available on Amazon. If you click through and make a purchase, I may earn a small commission at no additional cost to you. I only recommend products that I personally use and believe in!

Do you have any recommendations or personal guidelines that you find helpful?

Please feel free to comment and share your thoughts on “SuperSync - Higher than max flash sync speed”.